


See our NEW MODEL Phasm Camera full spectrum video camera with built in night vision and magnetic mounting system
![]()
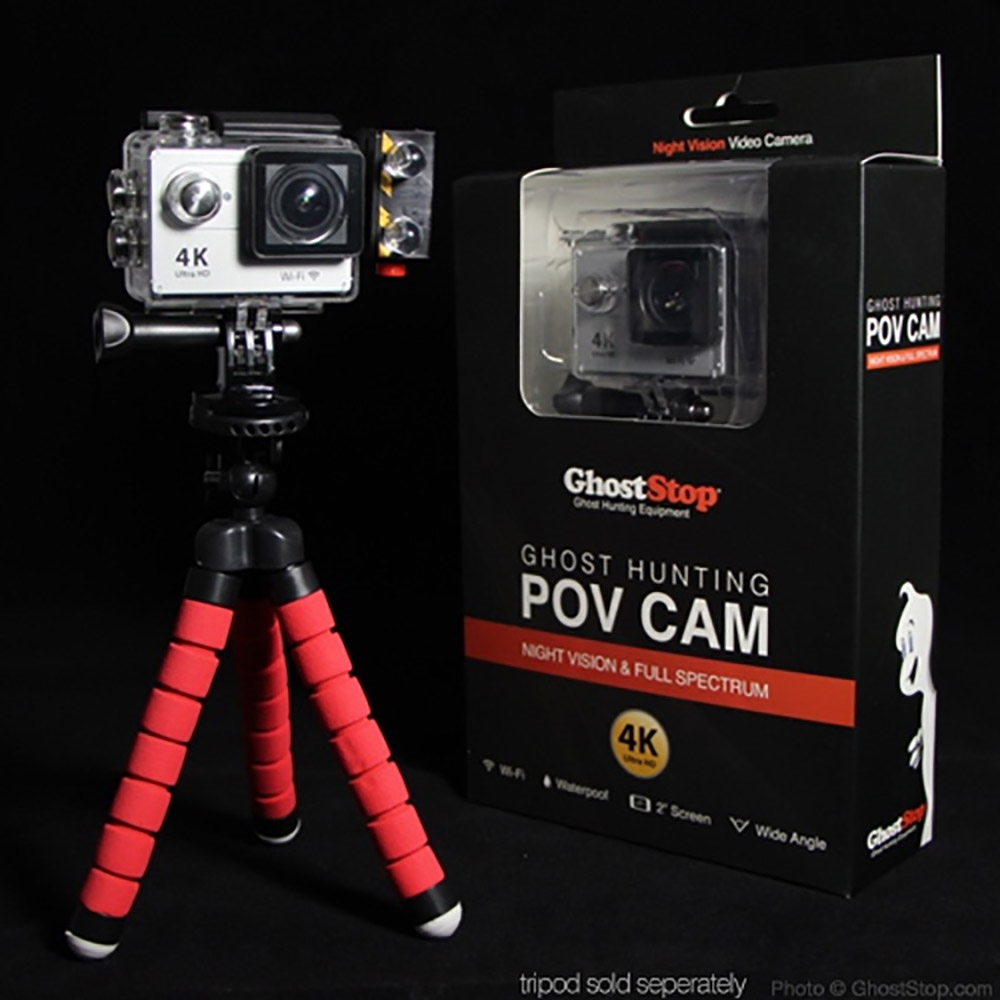
Full Spectrum Video Camera + Night Vision Light
This mountable POV camcorder takes true full spectrum, night vision HD video completely hands free. Mount it anywhere you like with any of the various mounting systems from head straps, chest mounts to bike mounts. This cam is compatible with GoPro mounts and accessories. Use the Wifi feature with a phone or tablet to view live video remotely.
 Best camcorder for investigations
- Made especially for ghost hunting!
- 4K Ultra HD resolution (4X the quality of 1080p)
- Exposure boost for brighter shots in low light
- Records in total darkness (with IR light for night vision)
- Live View via Wi-Fi with your phone/tablet free download
- Unlimited power! Plugs into power or USB battery
- Wide selection of mounting capabilities (many included)
- Wide-angle lens to capture it all
- Made by GhostStop specs for low light and extended battery life
- Rechargeable and replaceable battery - swap them out as needed
- NEW! Upgraded faster FPS: now up to 120fps
This is NOT your average clone!
This cam is made right here at GhostStop with investigators in mind. These are not built for snowboarders and cyclists. We have taken our years of experience ghost hunting and building to put the best low-light specs into a camcorder we can stand behind. From battery life and resolution right down the a high quality sensor made for low light, we are confident you'll find this the best for your investigations as well.
This modified full spectrum 4K Ultra HD camcorder takes full spectrum video to a whole new level that you can mount anywhere. This camcorder has been professionally modified with UV and IR sensitivity to view the full spectrum of light including light not seen with the human eye.
FREE IR Light + Accessories for a LIMITED TIME!
 Better specs than ever.
We have designed these cameras specifically for extended use in low light. Not only have we modified it for full spectrum but we have also customized the cameras internal firmware in order to allow for more efficient power usage for extended recording time.
Full spectrum & night vision
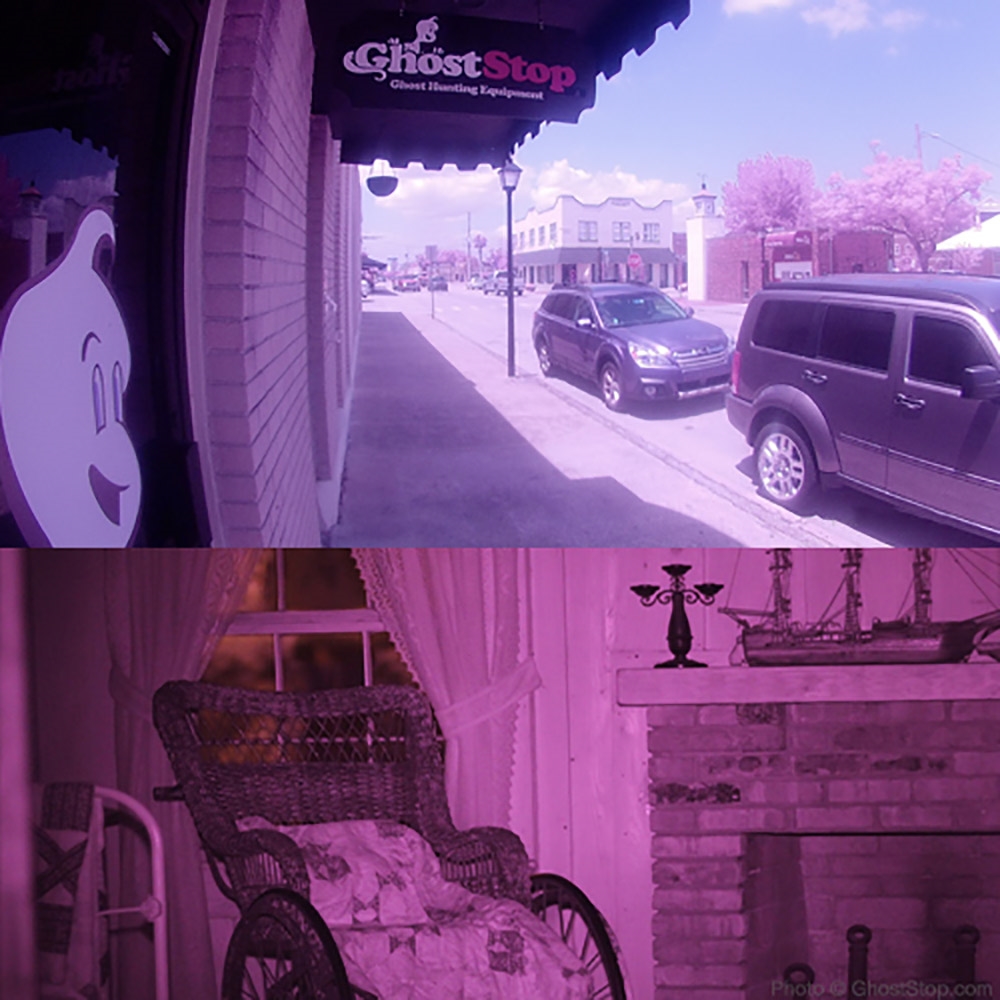
This full spectrum high definition video camera will capture images reflected within both ends of the light spectrum - where theories suggest that spirits reside. You can use it as a night vision camera or go full spectrum with your choice of lighting. As flexible as this camera is, you will find it an effective and essential photographic evidence gathering tool.
Mobile App
*NOTE* This camcorder may not be suitable for everyday use such as family gathering and sporting events as the hardware modifications to the unit make the picture constantly a 'pinkish' hue during use in daylight.
- Video Resolution: 4K HD (3840 X 2160 @ 15fps), 2.7K HD (2704x1524 @ 24fps), 1080p HD (1920x1080 @ 60/30fps), UPDATED>> NEW OPTION: 120fps @ 720p option
- Photo Resolution: 12M/8M/5M/4M
- Exposure Boost up to +2.0
- View Angle: 170°
- HDMI Output for Display Output
- Frequency range: roughly ~200nm (UV) to ~900nm (IR)
- Wi-Fi: 802.11 b/g/n
- Display Screen: 2" LCD
- External memory: Micro SD up to 32GB
- Micro USB Connection
- Power Adaptor
- Built-in Microphone
- Rechargeable and Detachable Battery
- Battery Life: about 5 hours to 30 minutes depending on Mode and Settings
- Extend Battery Life: Camera plugs into USB battery pack or wall outlet for extended life and simultaneous charging while recording.
- Battery Life Test: about 5 hours in Photo Mode and about 1 hour of Video at 1080p/30 with standard settings (NOTE: battery life greatly depends on various settings)
- Movie Format: MOV
- Photo Format: JPG
- Time stamp option
- Multiple language options
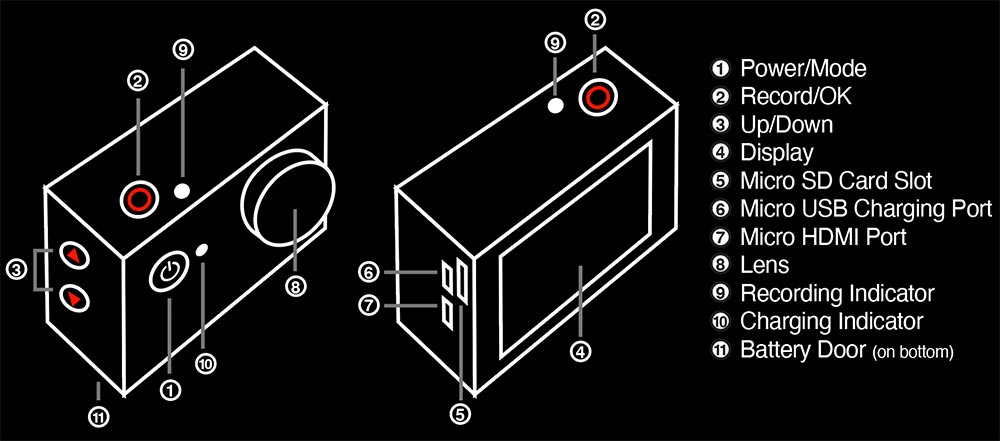
DIRECTIONS
Quick Start
To record video, verify the camera is in VIDEO mode and that a compatible Micro SD card is inserted into the camera. If the VIDEO icon on your camera's LCD screen is not showing, press the POWER/MODE button repeatedly until it appears.To Start Recording: Press the OK/SHUTTER button. The camera will emit one beep and the camera status light will flash while recording.
To Stop Recording: Press the OK/SHUTTER button. The camera status light will stop flashing and the camera emits one beep to indicate recording has stopped.
For night vision and low light situations we highly suggest increasing the exposure to +2. This will maximize the amount of light the camera allows into the lens which is helpful in low light situations when you need as much light as possible. It is possible we have already set as default on your camera. But it never hurts to check. To do this:
Press MODE 4 times until you see the wrench icon.
Press OK/SHUTTER.
Press DOWN arrow 3 times until you have selected 'Exposure'.
Press OK/SHUTTER.
Press UP or DOWN in the options to select '+2.0'.
Press OK/SHUTTER and the exposure is now set.
To exit settings, press UP 4 times to select the 'X' then press OK/SHUTTER to get back to taking photos or video.
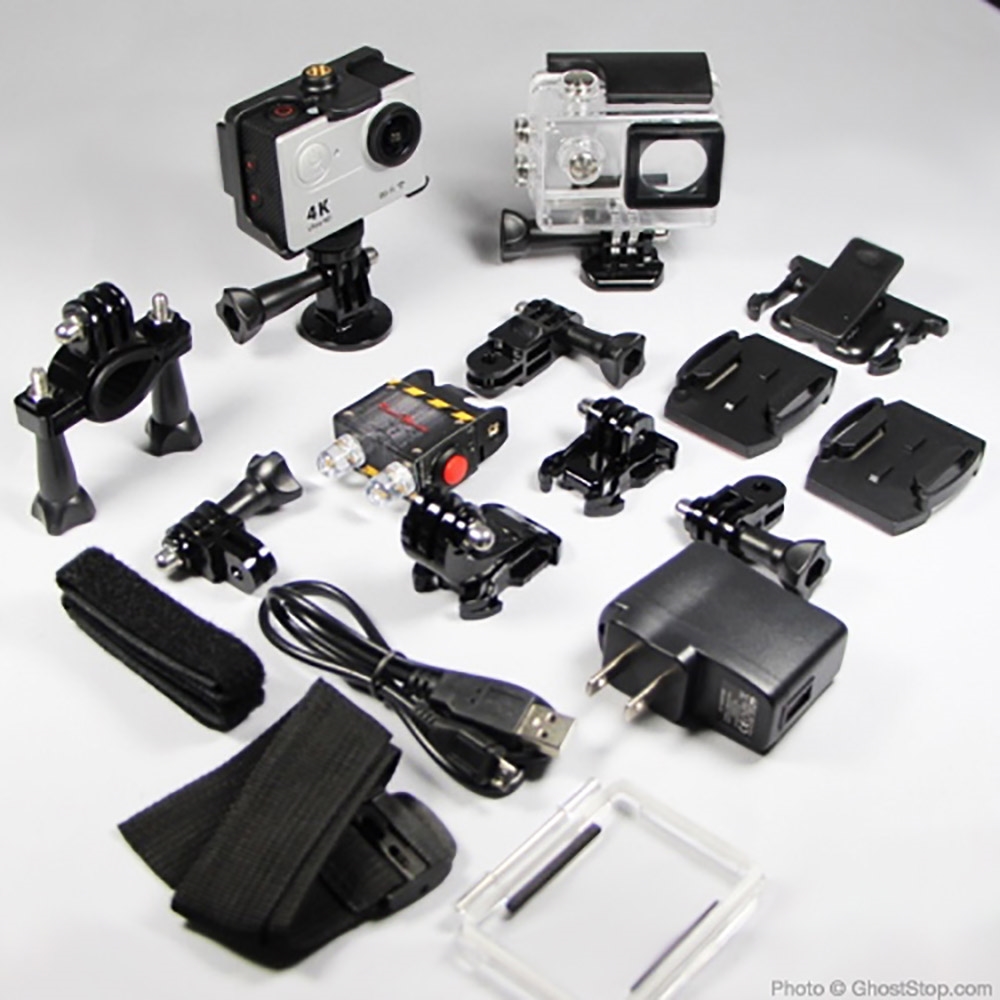
Package Includes
- Camcorder
- Waterproof housing
- Open housing with tripod mounts (tripod not included)
- Battery
- Large assortment of mounts, adhesive mounts, converters and straps
- USB data / charging cable
- Cleaning cloth
- User guide
Storage Media / Micro SD Card
This camera is compatible with 16GB and 32GB capacity microSD and microSDHC. Cards greater than 32GB may not work at all. We highly suggest using a Class 10 speed card to ensure quality recording. Anything slower than Class 10 could cause disruptions in recording.Mobile App
LINKS: Apple App Store | Google PlayTo connect to your mobile app click on the DOWN button on the side of the camera to turn on the WiFi connection. Connect to this WiFi in your phone/tablet settings. Default password is 1234567890. Once connected, go into the mobile app and pair with the camera. Once paired, you will be able to view live video and control the camera.
Connecting to the iSmart DV App.
- Download the iSmart DV App to your smartphone or tablet at the Google Play or Apple App Store.
- Press the Power/Mode Button to power camera ON.
- Make sure the camera is in Camera modes.
- Press the Down/Wi-Fi Button to turn on Wi-Fi.
- In your smartphone or tablet's Wi-Fi settings, connect to the network called "ICAM-H9" followed by a series of numbers.
- Enter the password: The default if you have not changed it is "1234567890".
- Open the iSmart DV App on your smartphone or tablet.
If you have printed directions that mention another app and that is not working for your device, just use the app listed above. This is a more recent update.
Battery
- Connect the camera to a computer or USB power supply.
- The Charging Status Light remains ON while the battery is charging.
- The Charging Status Light will turn OFF when the battery is fully charged.
Battery Life: Depends greatly on settings ranging from ~5 hours in Photo Mode to ~2 hours in Video Mode. Battery life will be lesser using higher resolution, higher FPS speed and various other features or setting. With high video resolution, high frame rate and with the display on all the time, the battery may only get 30 minutes of life. So, choose the settings that best fit your situation. Keep in mind, you can always plug the camera in to an external battery pack or wall outlet for extended life.
Video Recording
Photo Mode
Burst Photo Mode
Time Lapse Photos
Playback
- Verify the camera is in Camera mode.
- Press the Up/Playback button to enter the Playback menu.
- Repeatedly press the Power/Mode Button to cycle through Video and Photo.
- Press the Shutter/Select Button to select desired option.
- Use Up/Playback Button or Down/Wi-Fi Button to cycle through the various options.
- Press the Shutter/Select Button.
- To return to the Playback menu, press thePower/Mode Button.
- To exit, hold down the Up/Playback Button for two seconds.
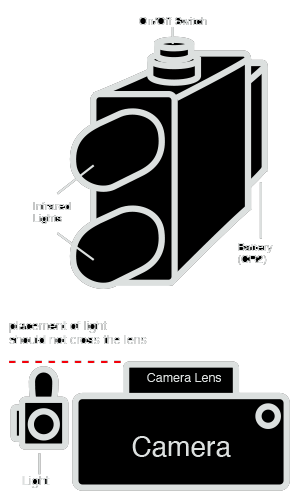
IR Light Directions
1. Insert CR2 battery in receptacle on back of light2. Press Red button to turn IR light on
3. Aim light in front of IR sensitive camera
This infrared light was built as a compact solution to quickly and easily add infrared light to compatible cameras. With two high-powered infrared LED lights you can attach this to any camera system that has full spectrum or infrared sensitivity. Use the included hook & loop patches to attach it to anything
- Using the two-sided Velcro strips, peel back the tape and stick to the camera without obstructing any functional areas. Cut as needed.
- Make sure the placement is such that the LED lights do not pass the lens of the camera. Doing so may cause unwanted lens flares. If you are seeing lens flares, move the light back and further away from the camera lens. See illustration as a guide.
- Insert a battery into the mounted battery holster (3-volt, size: CR2).
- Push the on/off toggle button to turn on the light.
NOTE
The LED lights on this unit are infrared only. Since there is no visible light emitted from the unit you will not see them light up with the naked eye. You must have an infrared sensitive camera or camcorder to take advantage of this light system. Depending on the camera model and sensativity to light, this unit will generally allow an infrared capable camera to see up to 12 feet in total darkness. As with all cameras, more light equates to better picture quality.
34 Reviews
-
One of the best quality cams!
Even though this product has been discontinued, I still love this product. Combining it with some of the paranormal software on my PC i came across some amazing results on some late night adventures.
-
Fantastic top of the line equipment
I love that Ghost Stop makes their own equipment. The Phase is fantastic. Full-spectrum, high-quality video and photos. It outperforms very expensive, large models. Highly recommended!
-
Works great!
Believe me when I tell you that this camera is amazing!! The picture quality is great!
-
Works great after being sent back
I got my camera and took it out the same night on an investigation. Upon reviewing the video I realized the camera wasn’t able to reach out even a foot in complete darkness even when using multiple IR illuminators. I contacted GhostStop and had to send the unit back in. I will say they have fantastic customer service and once they fixed the camera it runs like a champ. I would say definitely buy this camera but GhostStop please tighten up the quality control on your products.
-
4K Camera
Been using these cameras for 3 years now. Still impressed by the quality of these little devices! I now have three, and when coupled with the Phasm light and the battery back up, you will have hours of recording time (depending on your setting, of course!). Highly recommended!
-
Great resolution when not streaming to iPad
I took this camera out on a 12-hour investigation of the Cresson State Correctional Institute, and it performed like a work horse. I'm still going through the footage captured on it; but the resolution was wonderful and the IR add-on also performed without fault. This camera was a terrific investment and I look forward to using it on future investigations. So why only three stars? I discovered a loss in resolution when using the wifi feature, streaming the camera to my iPad. I point this out as I thought I caught a shadow figure at the door. I don't know if I would have seen it without the iPad; but on reviewing the footage, I am not certain if it was a shadow figure or if it's some kind of noise in the video created by the wifi feature. Without the wifi, I would have video clarity, but the on-camera screen cuts off after a minute or two. You're still recording, but it makes it harder to center your camera on a subject. I think if you pick up this camera, you may also want to pick up the PHASM light for extra kick in a larger space. So while I do recommend this camera, it is good to test its limitations. I felt like I did so at Cresson, and now have a better idea at what it excels at and where it needs some extra support.
-
Great little camera
Bought for vacation to Savannah and had no issues with the camera. Took some adjusting of the IR light to get it in the right place on the camera so it didn't leave white spots on the photos. Once we figured that out, phots came out great. Got an awesome capture in a mirror at the Andrew Low House.
-
FULL SPECTRUM POV CAM
Love this camera. It is awesome.
-
Great camera price or otherwise
I've recently put my new 4k full-spectrum camera through the paces, and I've got to say my initial impression is great. Dollar for dollar I can't think of a better camera. I paired mine with the Phasm light and could not be more happy at the level of flexibility, cost and portability. I wouldn't hesitate on this pairing if you are contemplating it.
-
This little thing is awesome!
This camera is amazing! The picture quality is great.
-
Full Spectrum pov cam
This little camera did a great job of catching orbs at the Stanely Hotel on my first sesh!
-
Great camera and great price!
I love that this camera allows you to use the standard battery (which lasts a little over an hour), plug it into a battery pack, or into the wall. It’s great to have options. The description says 32gb max SD card, but the book inside the camera says 32gb or 64gb. I have not had any issues using the 64gb card yet. I will update if this becomes an issue later. So far it is exactly as expected!
-
Works like a charm
I am using this camera to take time-lapse shots inside a pitch black machine. It is working great! ...and at a great value too. It took me a while to figure out there are two settings that need changing to turn on time-lapse; I didn't know about the "continuous mode" switch.
-
FULL SPECTRUM POV CAM
Love this cam. Went to Gettysburg PA at Sachs Bridge and it performed perfect and with a better IR light (like the Phasm) will light up the outside much better. Just ordered several of the Phasm lights for my equipment. Plus Ghost stop ships fast and very friendly. A must have cam for your paranormal investigations. A++++
-
Awesome Camera
I have used this camera for about 9 months. Easy to set up, easy to download, wonderful videos. The only complaint I have is the audio is not as great as my recorder. Does anyone know how to boost the audio or can the audio be boosted? If it had a mic or could use a mic attachment this would be even better! I would buy this camera again.
-
Full spectrum POV Camera
I just recently got my camera and I absolutely love it. This is the best night vision camera I've ever used and I 100% recommend getting one. I still have to figure out how to connect to wifi and how do the wireless live view on my phone but in all best camera ever.
-
Perfect!
Still learning the ins and outs of my new camera but I love it already! The IR light proved to be effective, just by messing with it in my bedroom I saw a white orb (not a dust particle) zip across my screen! Definitely worth the purchase
-
Great camera and light
The camera and light both are very good. I am very impressed.
-
Great cam, must have
Bought and used on an investigation 2 days ago. Great camera, awesome quality video, very easy to use. Battery lasted 2hrs 55 min at highest quality video recording setting. Haven't tried other functions (photos etc) yet. I will eventually have at least 3 or 4 of these cams to place strategically during investigations. Highly recommended.
-
4K POV Full Spectrum Camera
I read all of the reviews and decided to purchase this. This camera is great! Not only did it catch an interesting light anomaly during the last investigation, it captured some very impressive EVPs. One of which makes people throw off their headphones! Will be purchasing another soon.
-
Awesome Camera!!!
We purchased one of these POV cams to try it out before purchasing a few more. We have used it on three separate investigations so far with amazing results. It's extremely easy to use and the picture is pretty impressive for a camera in this price range. It's nice to know you don't always need to spend hundreds of dollars on gear to get great results!
-
Great quality (thumbs up)
The video quality on this little guy is fantastic. Going to buy more, thank you guys!
-
Ghostpro
Geat product amazing video quality
-
4K Full Spectrum Camera
This piece of kit is fantastic, it comes with all the necessary brackets to fit any situation. The videos I have taken since receiving mine have been excellent quality and it is so easy to use, the other great point is the fact it runs whilst plugged in (if using as a static) so no need to worry about the battery running out mid way through an investigation. The whole experience of purchasing with GhostStop was done with ease and communication regarding shipping and delivery was spot on. GhostStop are without doubt the best paranormal equipment retailer in the business.
-
Great device
Love the video on this small cam. It's a great addition to our equipment. Can monitor the camera on my cellphone.
-
Excellent
Great to set up and leave running
-
Excellent alternative to the more expensive POV's
I have one of these and it's a great little camera...the menu is easy to use and it has a lot of features on it. Very happy with it. It creates a new file every 10 minutes and the battery lasts a long time. You can also hook up a 2 amp 5v external battery like the ones you use on android phones for more battery life. I've had it for a year and it has been flawless with a crisp picture. Just remember to use an external IR lite if you're in total darkness.
-
Satisfied customer!
Got this unit and was a bit skeptical, but it shined like a diamond in the rut. I have tried a number of settings, environments, and conditions, and for what I use it for most the Full HD 1080P has the best results. Smooth video. One thing I did learn was that if your using this outdoors in daylight, you may want to lower the exposure to reduce the white wash in the pictures or video you are taking. The batterie, make sure you get several. I would also recommend getting the IR Wide angle and Dual IR/FS lights that they sell They complement each other and gives you more options when needed. I recommend this product.
-
great deal, nice piece of kit!
I love this cam! So convenient and easy to carry about. Excellent alternative to $$$ of other cams. Only reason I gave it 4 out of 5 was the limit on the SD card size (max 32 GB). Other than this, a really great buy!
-
Full Spectrum POV Cam
The first two nights of using this camera I got some awesome stuff. See video below. I'm going to get another one. The only reason I gave it a 4 start and not 5 is because the audio is not great. https://youtu.be/gdViCYnAszw
-
Super Cam
This camera produces excellent video and has good quick focus. Incredible night vision with proper lighting. A great deal for the price, and for paranormal investigating, is nearly as good as the GoPro. The case is durable and the accessories will let you mount it to most anything. I recommended using a light bracket and the Creepy Hollow Wide Angle Infrared LED light with it, for best in the dark near field results, as well as the flexible tripod they sell here at GhostStop, then its easy to hold or set down in a hurry.
-
Great Gopro alternative
This video camera is awesome with great quality and features quite close to what you would get with a GoPro - minus the high price tag. Great for night vision.
-
Don't let the price fool you! Sweet Deal!
This is a great product that comes with a sample pack of GoPro accessories. As far as the quality I couldn't be happier, in video mode while using the app the video is crystal clear, the guys on the tv shows would be envious! On the still camera shots they look great in the daytime, unfortunately in IR/Full spectrum the photos are a bit grainy hence the 4 star rating. Delivery was prompt and arrived as promised. This is defiantly a POV cam any group would be proud to have (and may argue over who's using it) I rigged a hat with 2 compact IR lights and a GoPro clip and using the app in this manner works magnificent. Thanks for a awesome piece of equipment Ghost Stop! You have a loyal customer in our group and myself!
-
Great Cam
This device is awesome. Easy to use and setup. Any paranormal team would benefit from this POV device. With the added illuminator we are able to record data in locations we didn't have IR cameras in. Outstanding product from an outstanding company.


