


See our NEW MODEL Phasm Camera full spectrum video camera with built in night vision and magnetic mounting system
![]()
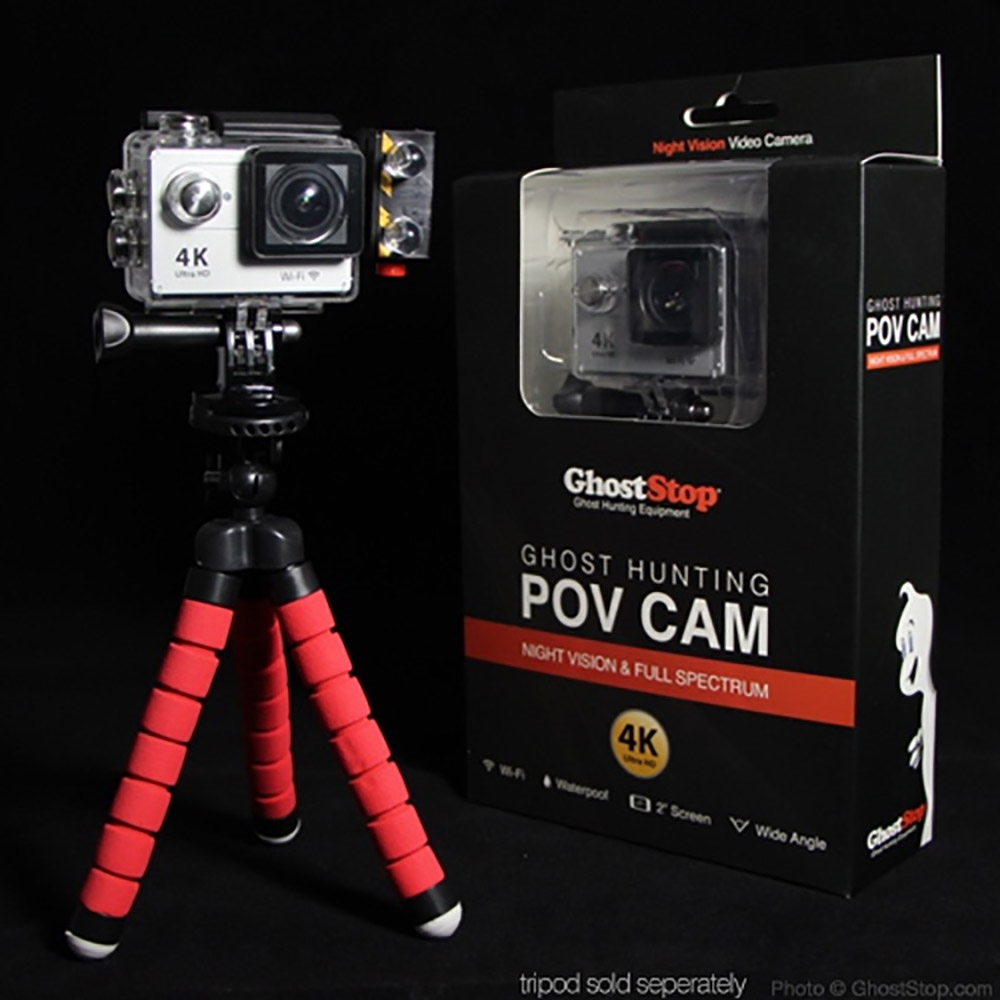
Full Spectrum Video Camera + Night Vision Light
This mountable POV camcorder takes true full spectrum, night vision HD video completely hands free. Mount it anywhere you like with any of the various mounting systems from head straps, chest mounts to bike mounts. This cam is compatible with GoPro mounts and accessories. Use the Wifi feature with a phone or tablet to view live video remotely.
 Best camcorder for investigations
- Made especially for ghost hunting!
- 4K Ultra HD resolution (4X the quality of 1080p)
- Exposure boost for brighter shots in low light
- Records in total darkness (with IR light for night vision)
- Live View via Wi-Fi with your phone/tablet free download
- Unlimited power! Plugs into power or USB battery
- Wide selection of mounting capabilities (many included)
- Wide-angle lens to capture it all
- Made by GhostStop specs for low light and extended battery life
- Rechargeable and replaceable battery - swap them out as needed
- NEW! Upgraded faster FPS: now up to 120fps
This is NOT your average clone!
This cam is made right here at GhostStop with investigators in mind. These are not built for snowboarders and cyclists. We have taken our years of experience ghost hunting and building to put the best low-light specs into a camcorder we can stand behind. From battery life and resolution right down the a high quality sensor made for low light, we are confident you'll find this the best for your investigations as well.
This modified full spectrum 4K Ultra HD camcorder takes full spectrum video to a whole new level that you can mount anywhere. This camcorder has been professionally modified with UV and IR sensitivity to view the full spectrum of light including light not seen with the human eye.
FREE IR Light + Accessories for a LIMITED TIME!
We include a free, infrared (IR) light with 2 triple-power LEDs that attaches directly to the camera for night vision support. Included light offers night vision visibility in total darkness. See light here. This cam also comes with a HUGE sampling of mounting accessories and is compatible with GoPro-type mounts.
 Better specs than ever.
We have designed these cameras specifically for extended use in low light. Not only have we modified it for full spectrum but we have also customized the cameras internal firmware in order to allow for more efficient power usage for extended recording time.
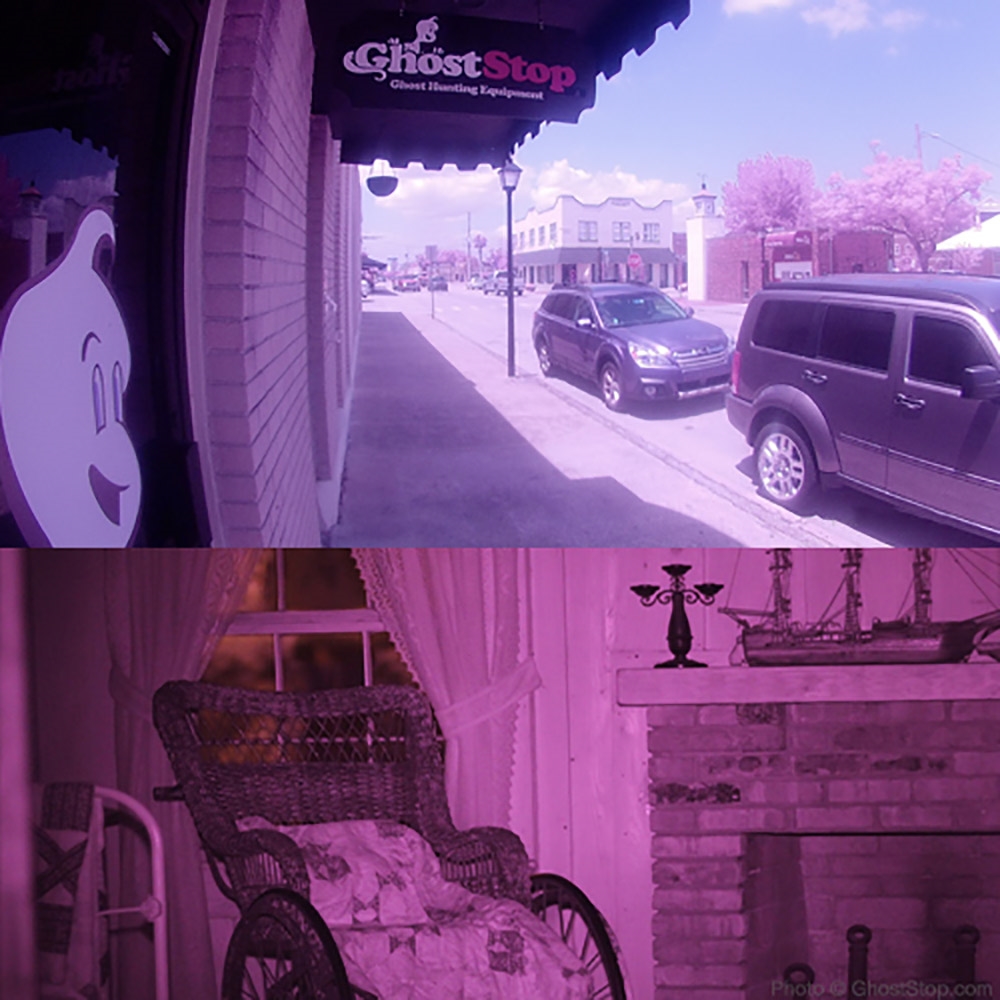
Full spectrum & night vision
This full spectrum high definition video camera will capture images reflected within both ends of the light spectrum - where theories suggest that spirits reside. You can use it as a night vision camera or go full spectrum with your choice of lighting. As flexible as this camera is, you will find it an effective and essential photographic evidence gathering tool.
Mobile App
Apple App Store | Google Play
 This product is made right here at GhostStop.
*NOTE* This camcorder may not be suitable for everyday use such as family gathering and sporting events as the hardware modifications to the unit make the picture constantly a 'pinkish' hue during use in daylight.
Better specs than ever.We have designed these cameras specifically for extended use in low light. Not only have we modified it for full spectrum but we have also customized the cameras internal firmware in order to allow for more efficient power usage for extended recording time.
Full spectrum & night vision
This full spectrum high definition video camera will capture images reflected within both ends of the light spectrum - where theories suggest that spirits reside. You can use it as a night vision camera or go full spectrum with your choice of lighting. As flexible as this camera is, you will find it an effective and essential photographic evidence gathering tool.
Mobile App
*NOTE* This camcorder may not be suitable for everyday use such as family gathering and sporting events as the hardware modifications to the unit make the picture constantly a 'pinkish' hue during use in daylight.
4K Ultra High Definition Digital Video Camcorder 1080p HD option offers high-speed, quality 60 frames per second New 120fps option now available Full spectrum camcorder with night vision capability 12MP Photos Wifi Live-View Display with free mobile app Mount it anywhere with many mounting options (compatible with most GoPro mounts) Plugs into power for unlimited use Rechargeable battery Detachable battery so you can swap out to a new one as needed Takes videos with audio, photos, burst shots and time-lapse Easy-To-Use System - Just Hit Record and Go! Audio Recording Records to a Micro SD card up to 32g (sold as an add-on)
- Video Resolution: 4K HD (3840 X 2160 @ 15fps), 2.7K HD (2704x1524 @ 24fps), 1080p HD (1920x1080 @ 60/30fps), UPDATED>> NEW OPTION: 120fps @ 720p option
- Photo Resolution: 12M/8M/5M/4M
- Exposure Boost up to +2.0
- View Angle: 170°
- HDMI Output for Display Output
- Frequency range: roughly ~200nm (UV) to ~900nm (IR)
- Wi-Fi: 802.11 b/g/n
- Display Screen: 2" LCD
- External memory: Micro SD up to 32GB
- Micro USB Connection
- Power Adaptor
- Built-in Microphone
- Rechargeable and Detachable Battery
- Battery Life: about 5 hours to 30 minutes depending on Mode and Settings
- Extend Battery Life: Camera plugs into USB battery pack or wall outlet for extended life and simultaneous charging while recording.
- Battery Life Test: about 5 hours in Photo Mode and about 1 hour of Video at 1080p/30 with standard settings (NOTE: battery life greatly depends on various settings)
- Movie Format: MOV
- Photo Format: JPG
- Time stamp option
- Multiple language options
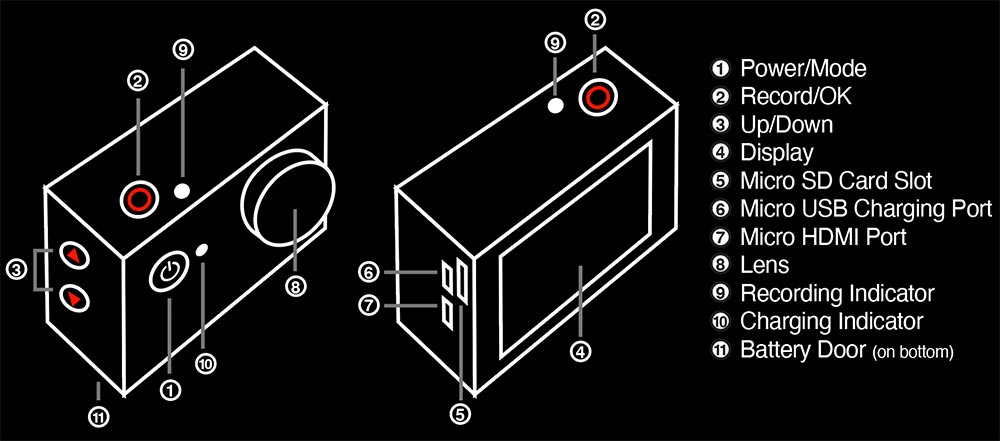
DIRECTIONS
Quick Start
To record video, verify the camera is in VIDEO mode and that a compatible Micro SD card is inserted into the camera. If the VIDEO icon on your camera's LCD screen is not showing, press the POWER/MODE button repeatedly until it appears.To Start Recording: Press the OK/SHUTTER button. The camera will emit one beep and the camera status light will flash while recording.
To Stop Recording: Press the OK/SHUTTER button. The camera status light will stop flashing and the camera emits one beep to indicate recording has stopped.
For night vision and low light situations we highly suggest increasing the exposure to +2. This will maximize the amount of light the camera allows into the lens which is helpful in low light situations when you need as much light as possible. It is possible we have already set as default on your camera. But it never hurts to check. To do this:
Press MODE 4 times until you see the wrench icon.
Press OK/SHUTTER.
Press DOWN arrow 3 times until you have selected 'Exposure'.
Press OK/SHUTTER.
Press UP or DOWN in the options to select '+2.0'.
Press OK/SHUTTER and the exposure is now set.
To exit settings, press UP 4 times to select the 'X' then press OK/SHUTTER to get back to taking photos or video.
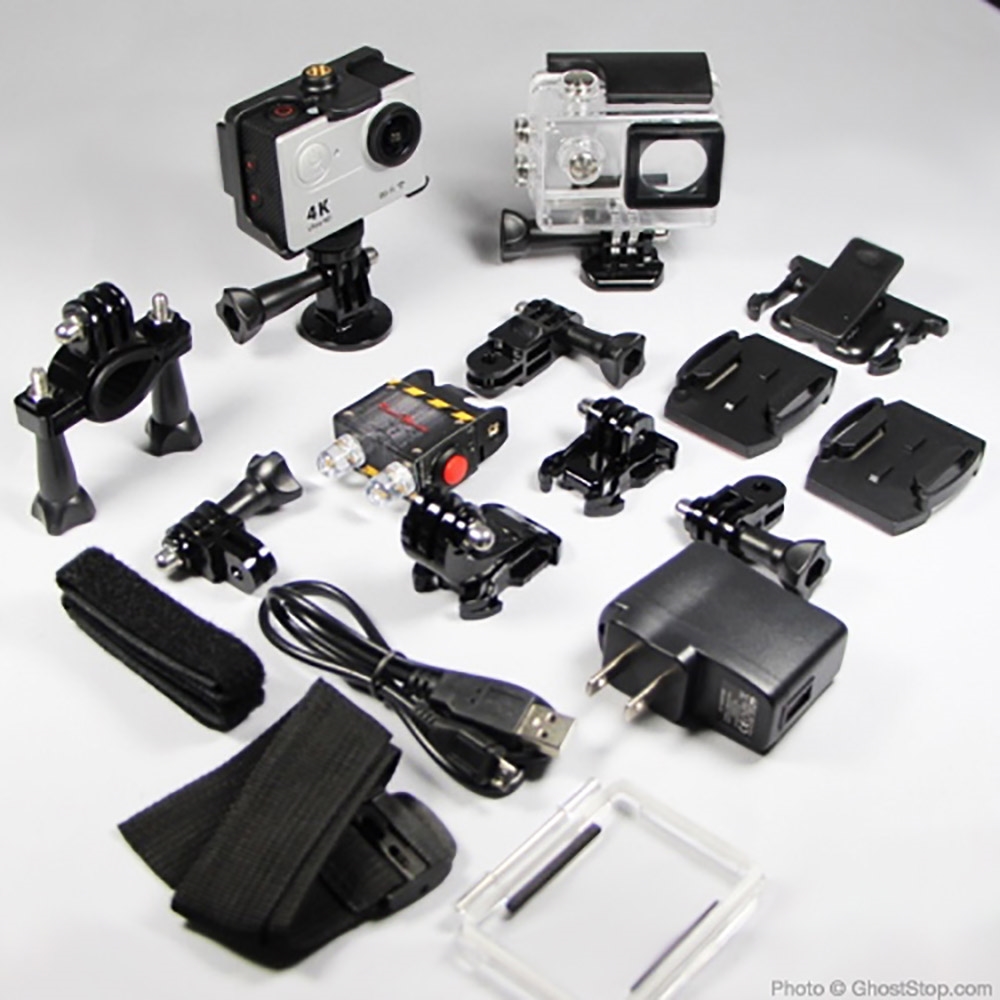
Package Includes
- Camcorder
- Waterproof housing
- Open housing with tripod mounts (tripod not included)
- Battery
- Large assortment of mounts, adhesive mounts, converters and straps
- USB data / charging cable
- Cleaning cloth
- User guide
Storage Media / Micro SD Card
This camera is compatible with 16GB and 32GB capacity microSD and microSDHC. Cards greater than 32GB may not work at all. We highly suggest using a Class 10 speed card to ensure quality recording. Anything slower than Class 10 could cause disruptions in recording.Mobile App
LINKS: Apple App Store | Google PlayTo connect to your mobile app click on the DOWN button on the side of the camera to turn on the WiFi connection. Connect to this WiFi in your phone/tablet settings. Default password is 1234567890. Once connected, go into the mobile app and pair with the camera. Once paired, you will be able to view live video and control the camera.
Connecting to the iSmart DV App.
The iSmart DV App lets you control your camera remotely using a smartphone or tablet. Features include full camera control, live preview, photo playback and sharing of select content and more.
- Download the iSmart DV App to your smartphone or tablet at the Google Play or Apple App Store.
- Press the Power/Mode Button to power camera ON.
- Make sure the camera is in Camera modes.
- Press the Down/Wi-Fi Button to turn on Wi-Fi.
- In your smartphone or tablet's Wi-Fi settings, connect to the network called "ICAM-H9" followed by a series of numbers.
- Enter the password: The default if you have not changed it is "1234567890".
- Open the iSmart DV App on your smartphone or tablet.
If you have printed directions that mention another app and that is not working for your device, just use the app listed above. This is a more recent update.
Battery
This camera includes a rechargeable and replaceable battery. Make sure it's charged up and ready to go before every investigation.
To charge the battery:
- Connect the camera to a computer or USB power supply.
- The Charging Status Light remains ON while the battery is charging.
- The Charging Status Light will turn OFF when the battery is fully charged.
Charging Time: ~5 hours
Battery Life: Depends greatly on settings ranging from ~5 hours in Photo Mode to ~2 hours in Video Mode. Battery life will be lesser using higher resolution, higher FPS speed and various other features or setting. With high video resolution, high frame rate and with the display on all the time, the battery may only get 30 minutes of life. So, choose the settings that best fit your situation. Keep in mind, you can always plug the camera in to an external battery pack or wall outlet for extended life.
Battery Life: Depends greatly on settings ranging from ~5 hours in Photo Mode to ~2 hours in Video Mode. Battery life will be lesser using higher resolution, higher FPS speed and various other features or setting. With high video resolution, high frame rate and with the display on all the time, the battery may only get 30 minutes of life. So, choose the settings that best fit your situation. Keep in mind, you can always plug the camera in to an external battery pack or wall outlet for extended life.
This camera automatically stops recording when the battery is out of power. Your video will be saved before the camera powers OFF.
TIP: If you need more battery life, we suggesting having spare batteries on hand or plugging this into a USB power supply. It will still work and record while plugged into a charging source which is super handy for extended use. A portable USB battery pack or plug into a wall outlet will keep this camera running for many hours.
Video Recording
To record Video, verify the camera is in Video mode. If the Video icon on your camera's LCD screen is not showing, press the Power/Mode Button repeatedly until it appears.
To start recording: Press the Shutter/Select Button. The camera will emit one beep and the Camera Status Lights will flash while recording.
To stop recording: Press the Shutter/Select Button. The Camera Status Lights stop flashing and the camera emits one beep to indicate recording has stopped.
Photo Mode
To capture a Photo, verify the camera is in Photo mode. If the Photo icon on your camera's LCD screen is not showing, press the Power/ Mode Button repeatedly until it appears.
To take a photo: Press the Shutter/Select Button. The camera will emit the camera shutter sound.
Burst Photo Mode
To capture a Burst Photo series, verify the camera is in Burst Photo mode. If the Burst Photo icon on your camera's LCD screen is not showing, press the Power/Mode Button repeatedly until it appears. In Burst Photo mode, your camera takes 3 photos in 1.5 seconds.
Time Lapse Photos
To capture a Time Lapse series, verify the Continuous Lapse is ON and camera is in Time Lapse mode. If the Time Lapse icon on your camera's LCD screen is not showing, press the Power/Mode Button repeatedly until it appears. In Time Lapse mode, your camera captures a series of photos at 2,3,5,10,20,30 or 60 second intervals.
To take Time Lapse: Press the Shutter/Select Button. The camera initiates countdown and emits the camera shutter sound each time a Photo is taken.
Playback
For playing back recorded videos and photos
- Verify the camera is in Camera mode.
- Press the Up/Playback button to enter the Playback menu.
- Repeatedly press the Power/Mode Button to cycle through Video and Photo.
- Press the Shutter/Select Button to select desired option.
- Use Up/Playback Button or Down/Wi-Fi Button to cycle through the various options.
- Press the Shutter/Select Button.
- To return to the Playback menu, press thePower/Mode Button.
- To exit, hold down the Up/Playback Button for two seconds.
IR Light Directions
1. Insert CR2 battery in receptacle on back of light2. Press Red button to turn IR light on
3. Aim light in front of IR sensitive camera
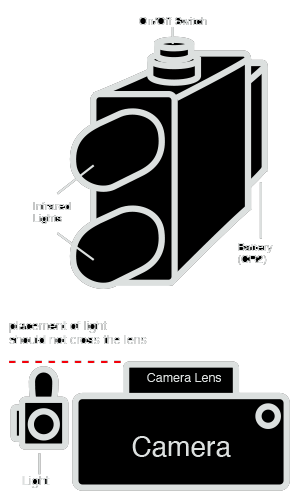
This infrared light was built as a compact solution to quickly and easily add infrared light to compatible cameras. With two high-powered infrared LED lights you can attach this to any camera system that has full spectrum or infrared sensitivity. Use the included hook & loop patches to attach it to anything
- Using the two-sided Velcro strips, peel back the tape and stick to the camera without obstructing any functional areas. Cut as needed.
- Make sure the placement is such that the LED lights do not pass the lens of the camera. Doing so may cause unwanted lens flares. If you are seeing lens flares, move the light back and further away from the camera lens. See illustration as a guide.
- Insert a battery into the mounted battery holster (3-volt, size: CR2).
- Push the on/off toggle button to turn on the light.
NOTE
The LED lights on this unit are infrared only. Since there is no visible light emitted from the unit you will not see them light up with the naked eye. You must have an infrared sensitive camera or camcorder to take advantage of this light system. Depending on the camera model and sensativity to light, this unit will generally allow an infrared capable camera to see up to 12 feet in total darkness. As with all cameras, more light equates to better picture quality.


